Monday, January 28, 2013

Burrow, Keep, Hoard

For anyone who likes to "roll the bones", this is for you.

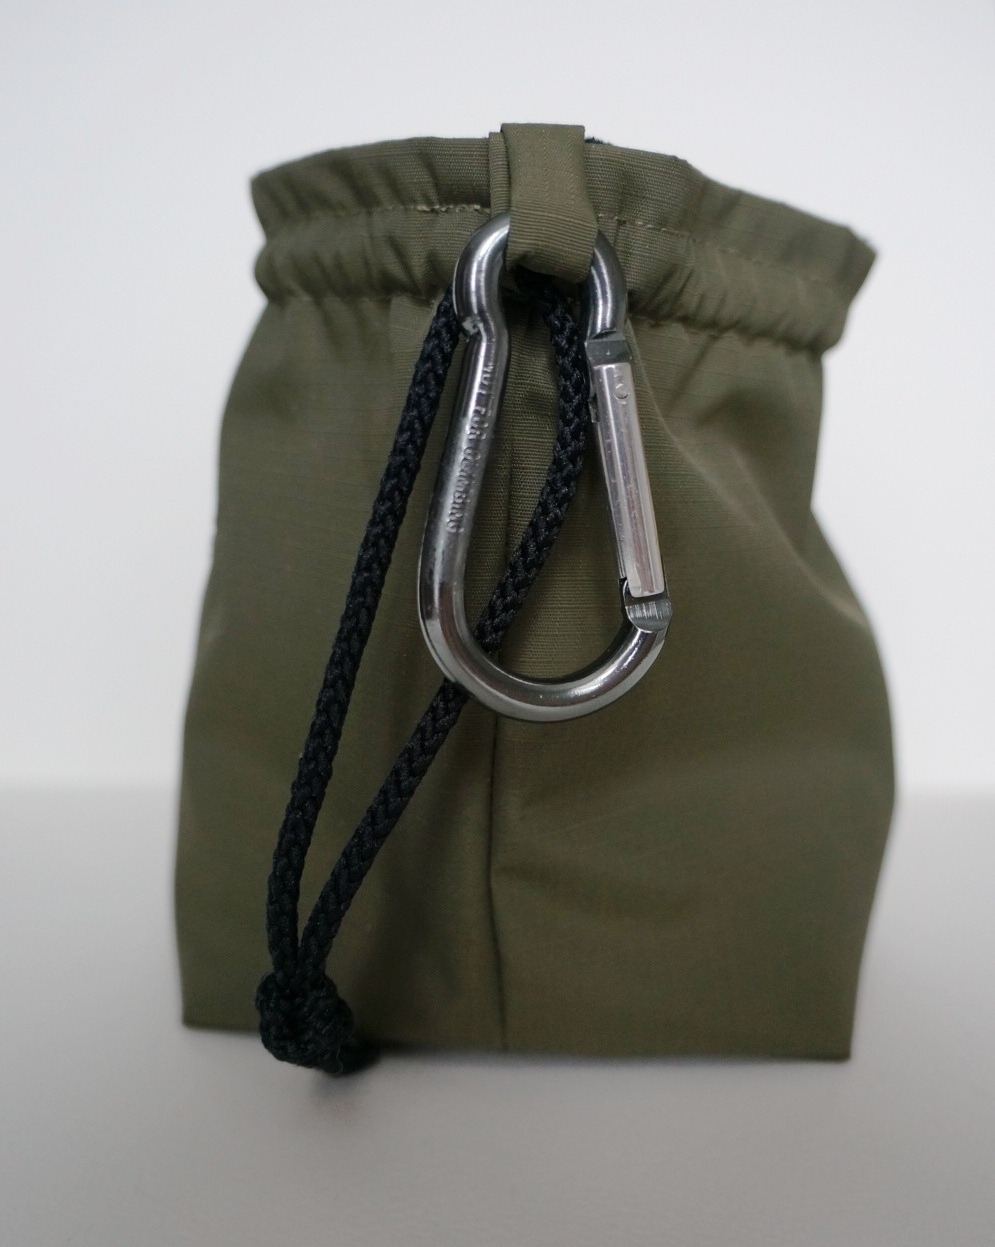
Announcing Sink or Swim dice bags!!!  Today I have for you the "Human Keep": 


Meausring 11 cm x 8 cm (4.4 in x 3.2 in) at the base and 13 cm (5.2 in)  high, the bag comfortably holds a full set of dice and other tokens.  The outer material is 100% nylon and waterproof while the inner lining is a luscious velvet. 


The drawstring cords are 100% nylon and very durable and ensures a tight closure so all of your die are secure.


The carabiner allows you to attach the bag to your belt loop or bag so you can have your hands free and ensure that your die are always accessible.


Each bag is available with optional, customizable embroidery.  Do you have a handle or quote you're particularly fond of?  Or perhaps you just want everyone to know it's your bag?  You choose what you want it to say and what you want to say to those around you.  


Spark RPG is a game my friend (and my source of inspiration for these bags), Jason, is currently developing.  Check him out at www.genesisoflegend.com.


All dice bags will be available in my Etsy shop starting this weekend (Feb 2nd).  Instead of offering premade bags, I'll be offering them as pre-orders that will allow you to customize your own bag according to your preferred outer fabric colour, lining colour and lettering you want to appear.  

Up next: 
  • the Halfling's Borrow - simple drawstring bag for nesting and separating your die and tokens in the larger bags
  • the Dragon's Hoard - bigger, smarter, reversible, for serious gaming

Thursday, January 24, 2013

She's coming home tonight...


I finally bit the bullet -- I'm getting an industrial machine.  Picking it up tonight in fact:)   Two years ago, when I was thinking of upgrading from my basic Kenmore, I was encouraged to look at an industrial machine by my instructor.  I won't lie, I was hesitant -- I love to sew knits and I didn't have a decent serger at the time that could handle them, so a machine with zig zag was really kind of important (these industrials are straight stitch only).  I did, however, vow to get a good, heavy mechanical machine at the very least.  

I came out with the most beefed up, modern, computerized quilting machine I could afford. Complete. Let. Down. 

In the first couple of months, I tried to sew snap tape onto my nephew's christening outfit, only to have the machine completely refuse to feed the fabric.  I ended up pulling out my $100 Kenmore and, bam, done in no time.  Let's just say, that incident set the tone for the rest of my relationship with this high-tech machine -- I would ask it to do something a little out of the ordinary, it crapped out, I fought with it for 1/2 hour trying to get it to work until, finally, in tears, I'd pull out my Kenmore and 5 minutes later it would be done. I wanted to throw that machine out the window. My dealer was absolutely no help  so I ended up selling the machine (for a significant loss) a year later to someone who will be able to enjoy and use all of the fantastic features it did have.  

Since then I've been using my trusty Kenmore.  Don't get me wrong -- it's a great little machine.  I'd tell anyone who's just starting to sew to go to Sears and grab a basic Kenmore.  They're affordable, sew decently and can tolerate beginner abuse.  But it doesn't have the power nor stitch quality I'm looking for -- it's my back up and not really meant to be my main machine.  

Say hello to Juki...or Judy as I will call her.  She's all metal, all heft and all speed. Purrrrr... I hope I'm not jinxing it by gushing about it before I even get it in the house, but I'm just so excited! 

Oh, and for those knit garments?  Well, I still have my trusty Kenmore...and a new serger (more on her later):)

Wish me luck!

Wednesday, January 16, 2013

Fun with Fur


I recently had the pleasure of refashioning a mink coat for a client into a muff as a Christmas gift for her SIL.   Honestly?  I had so much fun with this project.  I love to work with fur and leather and ripping things apart to see how they've been put together.  


This coat is in great shape and the first cut really scared me (I hope she's sure about this!).  I started by taking a stitch ripper to the lining and separating it from the coat.  You can see in this picture that fur coats are actually made by joining thin strips of fur together using a specialized machine for sewing fur.  You can also see the twill tape hand stitched along the hem and as a waist stay.


Often when opening up a fur coat, you will find sawdust that has settled into the hem or facings.  Not to worry!!  It's just a product of how the skins are cleaned.  Mind you, it can sometimes be a little alarming nonetheless:)


When cutting fur, it is very important not to cut the hairs, so scissors are out of the question.  I use a very sharp exacto knife to carefully cut the hide and then separate the fur with my fingers. 

Once I had my pattern cut out, I stitched twill tape (both new and that salvedged from the coat) to the seam allowances and whip stitched my pieces together by hand. My first iteration had the muff lined with some kasia and the coat lining, but when I tried it on to admire it, it didn't feel very warm and cozy.  So I took it out and lined it with fur.  Ahhhh, much better. 

I added a ribbon to go around the wearer's neck, accessorized it with a little mink pompom and voila!  A muff.  (please ignore the errant thread in the pic below!)


Gorgeous if I do say so myself.  I'm addicted -- I can't wait to do more projects like this!!  There's still plenty left of the coat so a stole is up next.  Squee!!!!!


I love that this project took something that wasn't being used and made it into a stylish accessory that is functional and that will hopefully get a lot of use.  I know fur is somewhat of a touchy subject for many people, but this way we are making sure to get as much use out of the skins as possible and extending the life cycle of the animals that went into it -- something I feel strongly about in this throw away time of our society. 

Wednesday, January 9, 2013

A New Year


Happy 2013  

I can NOT believe it’s already January.

I’ve been going back and forth on whether or not to write a post about my resolutions for this year or what I hope to accomplish.  Then I thought, what the hell, maybe by putting them out there I just might be more inspired to follow through!

I have a bunch of resolutions on a personal level that I won’t delve into here, suffice to say that I want to make the most out of every day, to live true to myself and to step out of my comfort zone every once in awhile.  All of this leads to one resolution that crosses the creative/personal/professional boundaries – better time management.  And by this I mean, spending just a little bit of time everyday to:
  • Tidy/clean – clutter f*cks with my creativity. I have a hard time getting into a groove when there’s stuff piled around me…which might explain my loss of sewing mojo the last month or so cause I’ve been living in pile o’ crap.  
  • Sew – I think I’m going to follow Tilly’s 15 minutes a day plan.
  • Knit – knitting’s my zen, nuff said.  I have no problems sneaking in knitting time.
  • Read – my back log of books is calling my name.  I recently went on a binge and have a stack of new fiction I can’t wait to dig into.  I’m on goodreads here 
  • Maggie – Mags is getting to the age where she’s needs little bit of extra primping and prodding to keep her at her healthiest.  She’s been good to me, this wonderful, itchy old gal, and I want her around as long as possible.  


From a business standpoint, I want to keep up my commission work and get more comfortable charging what I believe is fair (I habitually underestimate my time) instead of worrying that it will chase customers off.  If it does, so be it.  And, I’ve got a bunch of projects up my sleeve I want to get finished and out in the world to see how they’re received.  Hopefully I’ll be able to share soon! 
Lastly, I want to finish some of my works in progress that have been hanging around 75% done after I got distracted with something else new and shiny. More on these to come…
I could go on and on -- everyone knows I love to dream and plan!!  What about you out there – any resolutions in particular?  

Saturday, January 5, 2013

McCalls 9577

This is a 1968 pattern that I got from my mom's stash. I love the shift styles from the 60s and for design class last winter decided to make the first view (yellow coat with long sleeves) as a winter coat.  


It worked up beautifully in this poly/wool blend. It's lined with a kasia satin and has a chamois panel in the back.  Since this is a 36" bust and I'm a 34", I had to bring in the princess seams by quite a bit, but otherwise the only alteration for size was to lengthen it from what is shown in the picture (it is meant to be a winter coat after all!!). 


On the recommendation of my instructor, I moved the inseam pockets to welt pockets, which will be sturdier over the long run from the abuse of shoving my mittens, kleenex and poop bags in all winter.


I did a faux piping with black dupioni silk around the pocket flaps, mandarin collar and along centre front.  The button are covered with the same dupioni silk.


Here is the back view (I'm kind of proud of how well the pattern matches up :)).  

Now that it's finally winter again, I hope to wear it a lot!!